Your own signing certificate
SuaveDocs makes a certificate for everyone who signs. If your organisation or a certificate authority gave you a certificate of your own — a .p12 or .pfx file with a password — you can sign with it instead, in Sign PDF and on the page of a document you were sent.
To add it:
- Select your name in the top right and choose Settings.
- Under Signing certificate, select the Certificate file (.p12 or .pfx) — "A .p12 or .pfx file up to 64 KB."
- Type its Password — "The password that opens the file. SuaveDocs uses it once to read the certificate and never keeps it." — and, if you like, a Name (optional); its box suggests "My certificate".
- Select Add certificate.
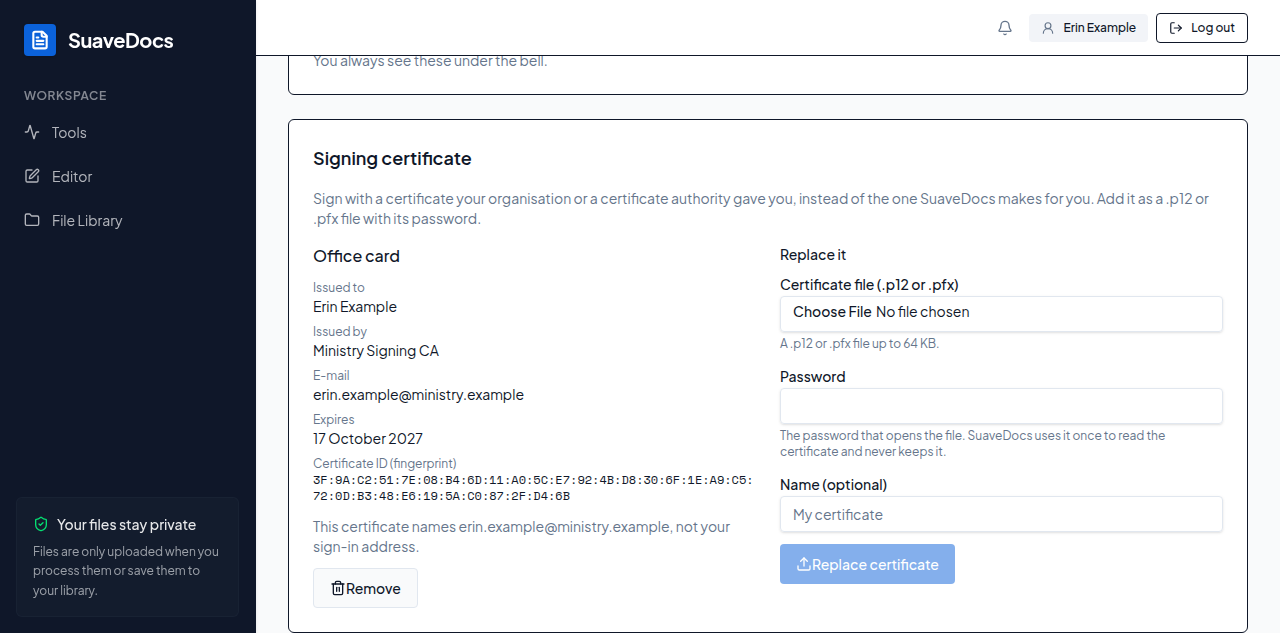 Figure: your own certificate in Settings.
What you'll see when it's done: "Certificate added. When you sign, choose it under More options." and the certificate's name, Issued to, Issued by, E-mail, Expires and Certificate ID (fingerprint). Under them SuaveDocs says whether the certificate names your sign-in address: "This certificate names your sign-in address.", or "This certificate names <email>, not your sign-in address." (readers will show that name; you can still sign with it), or "We couldn't compare this certificate's address with your sign-in address." when your own address isn't confirmed. A certificate that names no address shows no note.
To sign with it: open More options and choose My certificate: <name> under Certificate (see Edit PDFs → Sign PDF).
To replace or remove it: under Replace it, add the new file the same way and select Replace certificate — "Certificate replaced. When you sign, choose it under More options."; documents you already signed stay valid. Or select Remove and confirm — "Remove your certificate?" / "Documents you already signed with it stay valid. New signatures use the certificate SuaveDocs makes for you." / Keep it or Remove — "Certificate removed. New signatures use the certificate SuaveDocs makes for you."
- "Use a .p12 or .pfx file up to 64 KB."
- "That password doesn't open the certificate file. Check it and try again." — type the password again; the box is emptied after every try.
- "This certificate can't sign documents. Ask whoever issued it for a signing certificate."
- "This certificate expired on
<date>. Upload a current one." — also shown under your certificate once it has expired (Expires reads "Expired on<date>"); until you add a current one, More options offers only the SuaveDocs certificate. - "Too many uploads. Try again in
<n>minutes." — wait, then add it again. - "The certificate couldn't be added. Try again in a moment."
- "You can't change signing certificates in this workspace." or "This workspace is read-only right now, so changes can't be saved." — the workspace is read-only; your certificate can be changed once it isn't.
- "Your certificate couldn't be loaded." followed by the reason — select Try again.
- "Signing isn't set up on this server yet. Ask an administrator." — select Try again once it is.
- On the desktop app, offline: "Signing needs a connection." — your certificate stays on the server, never on your computer.