People
People shows only on a SuaveDocs server your organisation runs itself. It manages who has an account and who else is an administrator. Accounts themselves live in your organisation's login system; "Administrator" here means membership of the engine's admin group.
If people management isn't connected on this server, the whole screen is read-only and shows: "People management isn’t set up on this server yet. Ask whoever manages your SuaveDocs server to connect it to your login system."
Browse and filter
Everyone with an account is listed as soon as you open People, in name order. Each person shows their e-mail address, their status (Active, Never signed in or Deactivated), the groups they belong to in your login system, and a line such as "Added 3 Mar 2026 · Last signed in 14 Oct 2026". Someone who has never signed in reads "No sign-in yet". A person in more than three groups shows the first three and "+2 more" — point at it to see them all.
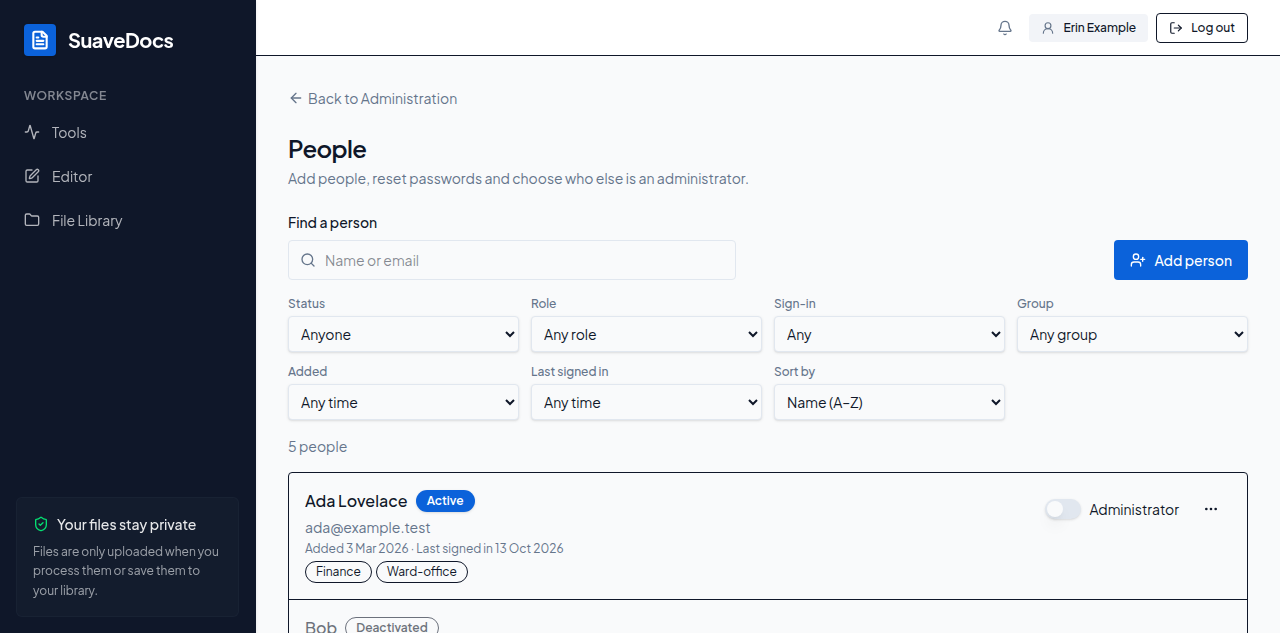 Figure: everyone on the People screen, with their status, groups and dates.
The line above the list says how many people there are: "24 people", or "1 person". Once you search or filter it says how many match — "12 people match" or "1 person matches" — and while there are more than are on screen, "Showing 50 of 124 people". Select Load more at the bottom to see the next ones.
To narrow the list, choose from any of these; the list changes as you choose:
- Status — Anyone, Active or Deactivated.
- Role — Any role, Administrators or Not administrators.
- Sign-in — Any, Never signed in or Has signed in. It isn't offered when your server doesn't record sign-ins, because SuaveDocs can't tell then.
- Group — Any group, or one of your organisation's groups with how many people are in it, for example "Finance (4)". It isn't offered when nobody is in a group.
- Added — Any time, Last 7 days, Last 30 days, Last 12 months, or Between dates…, which adds From and To boxes.
- Last signed in — Any time, In the last 7 days, In the last 30 days, Not in the last 30 days, Not in the last 90 days, or Between dates…. The two "Not in the last" choices include people who have never signed in.
- Sort by — Name (A–Z), Email (A–Z), Recently added or Recently signed in.
Clear filters appears as soon as anything is chosen or typed; it empties the search and every filter, and keeps your Sort by.
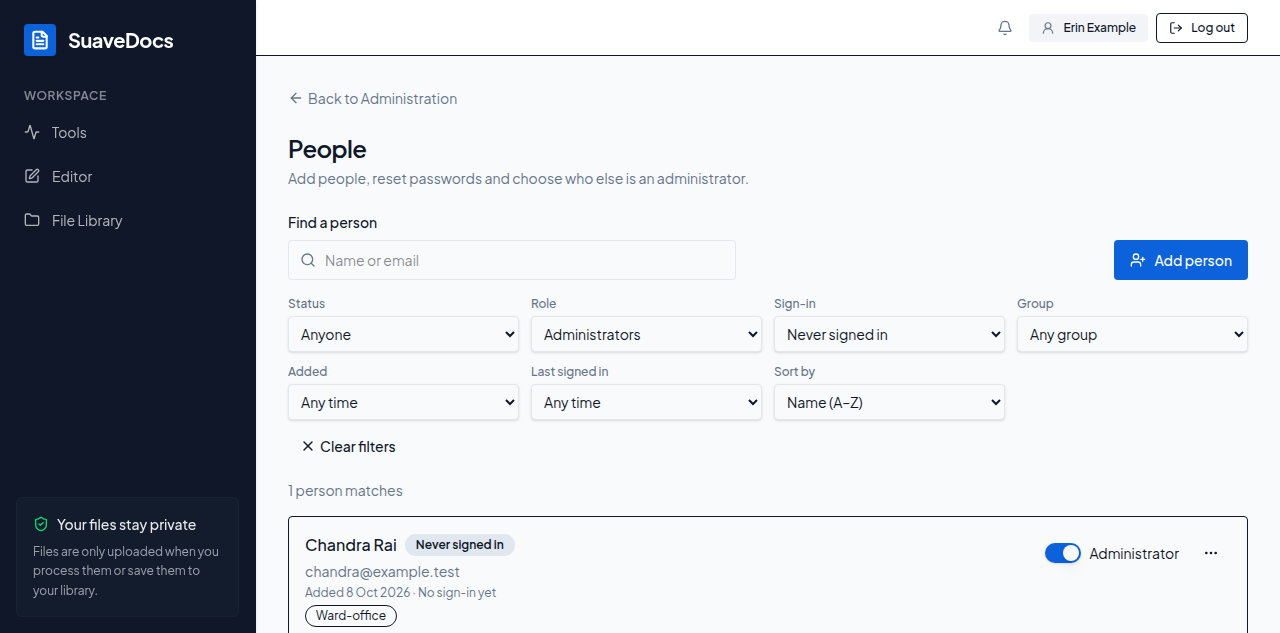 Figure: People filtered to administrators who have never signed in.
Last signed in comes from your organisation's login system, not from SuaveDocs, so it also counts signing in to any other app that shares the same login.
The address in your browser changes with every filter, so you can bookmark a view — for example administrators who have never signed in — or send it to another administrator, and it opens with the same filters chosen.
A person you've just changed — deactivated, say, while the list shows only Active people — stays where they are until you change the filters.
On a phone: the filters sit behind a Filters button, which says how many are chosen, for example "Filters (2)". It opens Filter people; choose what you need, then select the button at the bottom, which says how many people you'll see, for example "Show 12 people".
- Nobody has an account yet: "Nobody has been added to SuaveDocs yet. Select Add person to add the first one."
- Nobody matches the filters: "Nobody matches these filters." — select Clear filters under it to see everyone again.
- Just after SuaveDocs was set up: "SuaveDocs is still copying the people list from your login system. Try again in a few minutes." — select Try again when the few minutes have passed.
- SuaveDocs can't read its people list: "SuaveDocs couldn't read its people list. Try again in a minute." — select Try again.
- More people couldn't be loaded: the reason appears above the list, and the people already shown stay.
- On an older SuaveDocs server the screen can only search: it says "This SuaveDocs server can only search for people. Type at least 2 characters of a name or email to find someone." and the filters aren't shown.
The people limit
When your plan or license limits how many people can use SuaveDocs, a line above the list says how many have access and how many are included, for example "5 of 5 people", with a bar. On a server running as Community edition (see License) with more people than it includes, it adds: "Community edition includes 5 people; 7 have access. Everyone keeps their access. Add a license to add more people." Nobody loses access because of the limit. On a server your organisation runs itself, an administrator also gets Open License settings, which takes you to License (see License).
Find a person
To find someone by name or e-mail:
- Type into Find a person (placeholder "Name or email").
- Type at least 2 characters — fewer shows "Type at least 2 characters."
What you'll see when it's done: the people whose name or e-mail matches, within whatever filters you've chosen.
No matches shows Nobody matches "<query>". Check the spelling, or add them.
Add a person
Creates an account and emails the person a link to set their own password.
To add a person:
- Select Add person. The dialog explains: "They'll get an email with a link to set their password."
- Fill in Name and Email.
- Tick Administrator if they should be able to open Administration and manage people — the checkbox explains: "Can open Administration and manage people."
- Select Create account.
What you'll see when it's done: Account created. We emailed a set-password link to <email>.
- Name left blank: "Enter the person's name."
- Not a valid email: "Enter a valid email address."
- The invitation email couldn't be sent: "Account created, but the email couldn't be sent." — a Copy set-password link button appears so you can send it yourself.
- Making them an administrator failed even though the account was created:
Account created, but making them an administrator failed: <reason> Use the switch to retry. - The people limit is reached: "Community edition includes 5 people and 5 already have access. Add a license in Administration → License to add more." — with Open License settings. With a license it names the license and says to ask Xelvian to add more people; in a cloud workspace the sentence names your plan and says to ask for more, or to ask a workspace owner.
Set a password, or send a reset link
Gives a person a new password directly, or sends them a link to set their own.
To send a password reset email:
- Open a person's row menu (the "More actions" button at the end of their row).
- Select Send password reset email.
What you'll see when it's done: Reset email sent to <email>
"The email couldn't be sent." — a Copy set-password link button appears as a fallback.
To set a password yourself:
- Open the row menu and select Set a password.
- Type New password and Confirm password — at least 8 characters ("At least 8 characters. Your login system may ask for more.").
- Select Set password.
What you'll see when it's done: Password set. Tell <name> their new password and suggest they change it from their profile.
- Fewer than 8 characters: "Use at least 8 characters."
- The two boxes don't match: "The two passwords don't match."
To copy a one-time set-password link:
- Select Copy set-password link wherever it's offered.
What you'll see when it's done: "Link copied. Send it to the person." — the note under it reminds you: "This link works once and expires in 24 hours."
Deactivate or reactivate
Stops (or restores) a person's ability to sign in, without touching their files.
To deactivate someone:
- Open their row menu and select Deactivate.
- Confirm — the dialog reads
Deactivate <name>?/ "They can't sign in until reactivated. Their files and shares are kept."
What you'll see when it's done: the person's row shows "Deactivated".
To reactivate them: select Reactivate on their row — no confirmation is asked.
When the people limit is reached, reactivating someone is turned down with the same sentence as adding a person.
This option, like several others, is not available on your own row.
The Administrator switch
Grants or removes another person's access to the admin area.
To make someone an administrator: turn on the Administrator switch on their row — it takes effect immediately, no confirmation needed.
To remove someone's administrator access: turn the switch off. Confirm — the dialog reads <name> will no longer be able to open Administration. / "They keep their account and files." — then select Remove administrator.
You can't change your own access — your own row shows "You can't change your own access." instead of a switch you can use.
Delete a person
Permanently removes someone's account from the login system.
To delete someone:
- Open their row menu and select Delete.
- A confirmation dialog appears:
Delete <name>?/ "This removes their account from the login system for good. They will not be able to sign in, and this cannot be undone. Type their email address below to confirm."
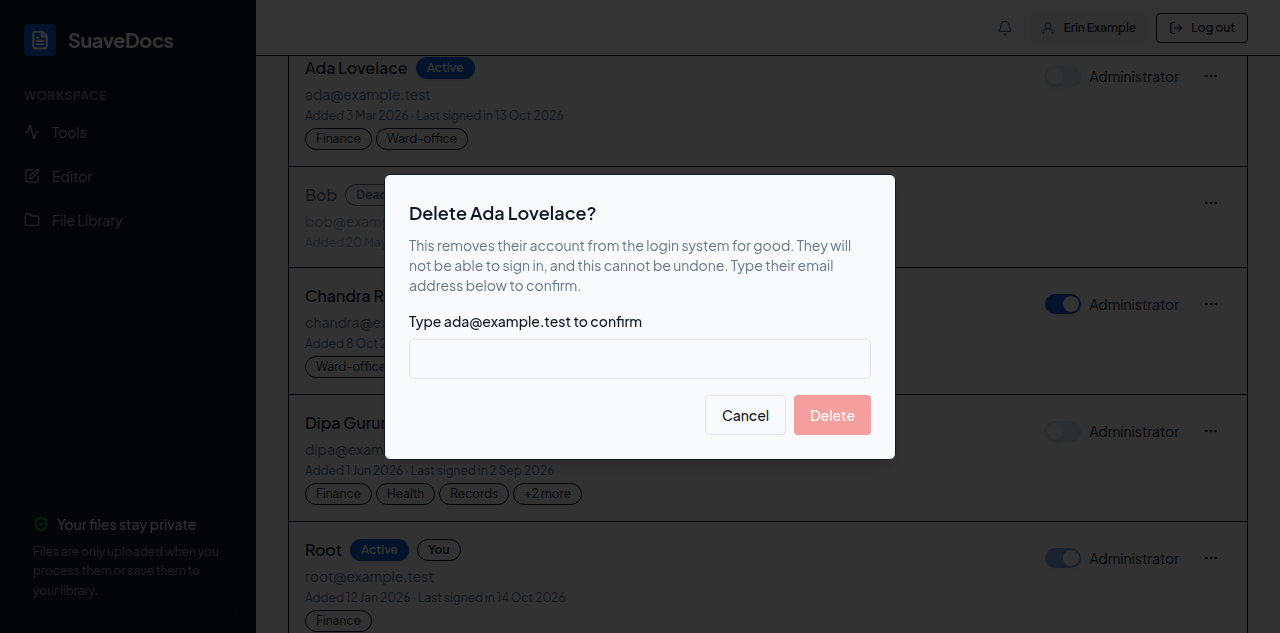 Figure: the delete confirmation — the Delete button stays disabled until the email matches.
- Type their email exactly, under the prompt
Type <email> to confirm. The Delete button only enables once it matches. - Select Delete.
If they still have documents, the dialog grows a second step instead of failing: "<name> still has <number> document(s)." Choose one:
- Keep them in the Archive (chosen by default) — "Anyone
<name>shared them with keeps access. You'll find them under Archive in Files." The button becomes Archive and delete. - Move them to someone else first — "Choose who they go to. Shares stay as they are." Search for the new owner under Search for a person (the person being deleted is never offered as their own target). The button becomes Move and delete, and stays disabled until you've picked someone.
Select the button again to confirm your choice. While the request is running the button is disabled and reads Deleting…, Archiving… or Moving…, so it can't be clicked twice.
What you'll see when it's done: the person disappears from the list.
- The person still has documents and you haven't chosen yet: the dialog grows the second step described above; nothing else changes.
- Moving their documents couldn't be completed: the reason appears on their row, prefixed "Couldn't move their files: " followed by the server's own explanation — for example, if the person you picked turns out not to be in SuaveDocs any more by the time you confirm.
- Deleting accounts isn't available on this server at all: "Deleting accounts isn't available on this server yet."
This option, like Deactivate, is not available on your own row.